
These 3 easy Halloween treats for any spooking party! We’re talking White Chocolate Ghost Strawberries, Frankenstein Rice Krispy Treats, and Chocolate Pretzel Spider Turtles that obviously require no baking. They take 15 to 30 minutes of active prep, and use store-bought pantry staples.
All of these Halloween Treats can be made up to 2 days in advance, making them ideal for classroom parties, kids’ events, and spooky buffet spreads.
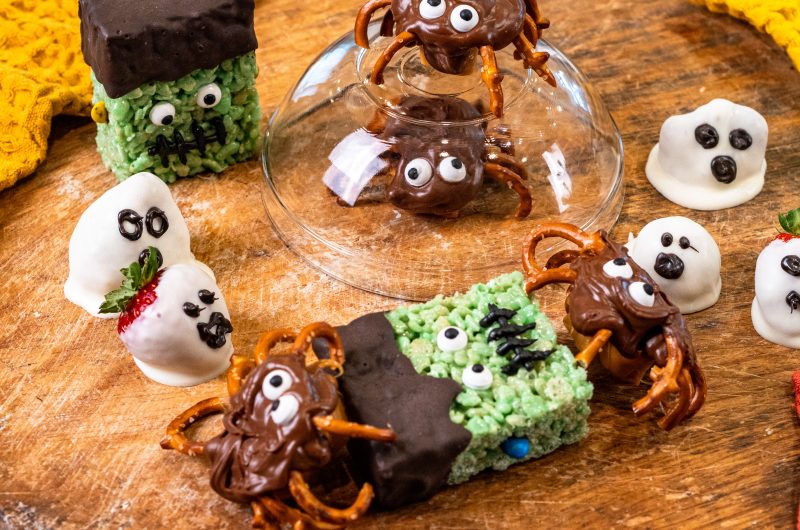
3 Easy Halloween Treats to Make for a Party (No-Bake Spooky Snacks)
Ingredients
- White Chocolate “Ghost” Strawberries
12 large strawberries, stems removed, washed and thoroughly dried
12 oz white chocolate melting wafers, or white chocolate chips
1 teaspoon coconut oil, optional, for smoother dipping
2 tablespoons melted chocolate, for the eyes and mouth
Black food-safe gel food coloring, for the eyes and mouth
Bamboo skewers or cake pop sticks, for dipping
- Frankenstein Rice Krispy Treats
3 tablespoons unsalted butter
10 oz mini marshmallows
6 cups crispy rice cereal
6 drops green gel food coloring
12 oz candy melts or chocolate, melted, for the hair
24 candy eyes
2 tablespoons melted chocolate, for the mouth and stitches
Black food-safe gel food coloring, for the mouth and stitches
12 brown mini M&Ms or chocolate chips, halved, for the neck bolts
- Chocolate Spider “Turtles”
72 traditional shaped hard pretzels (the classic twisted knot shape)
18 soft caramel candies, unwrapped
1 tablespoon heavy cream
12 oz semi-sweet or dark chocolate melting wafers
36 candy eyes
Flaky sea salt, optional, for finishing
Directions
- White Chocolate “Ghost” Strawberries
- Make sure the strawberries are completely dry before you begin — any trace of water will cause the chocolate to seize. Pat them thoroughly with paper towels and let them air-dry for another 10 minutes if needed.
- Melt the white chocolate and coconut oil together in a microwave-safe bowl in 20-second bursts, stirring well between each, until smooth and pourable.
- Using a bamboo skewer or cake pop stick inserted into the flat top of each strawberry, dip it into the melted chocolate, letting the excess drip back into the bowl. Try to cover most of the berry, leaving the pointed tip slightly exposed for a ghost-tail effect.
- Place the dipped strawberries flat-side down, tip pointing up, on a parchment-lined tray, so the chocolate settles naturally at the base like a little robe. Carefully twist and remove the skewer once the strawberry is set in place.
- While the chocolate is still wet, stir a little black food coloring into the melted chocolate, transfer to a small piping bag or a zip-top bag with the corner snipped off, and pipe two small dots for eyes and an “o” for the mouth onto each strawberry.
- Refrigerate for 15 to 20 minutes, until the white chocolate is fully set and firm to the touch.
- Frankenstein Rice Krispy Treats
- In a large pot over low heat, melt the butter, then add the marshmallows and stir constantly until fully melted and smooth.
- Remove the pot from the heat and stir in the green gel food coloring until the marshmallow mixture is evenly colored a monster green.
- Add the crispy rice cereal and fold gently with a greased spatula until fully coated, working quickly before the mixture cools and firms up.
- Press the mixture firmly and evenly into a greased 9×13-inch pan, using a greased spatula or a piece of wax paper to smooth the top. Let cool completely, about 30 minutes.
- Cut the cooled treats into rectangular blocks — slightly taller than they are wide works best for the classic Frankenstein head shape.
- Dip or spread the top third of each rectangle with the melted candy melts to create a hairline, letting it drip slightly down the sides.
- Press two candy eyes onto each treat. Stir a little black food coloring into the melted chocolate, transfer to a small piping bag or a zip-top bag with the corner snipped off, and pipe on stitches, scars, and a mouth.
- Press the halved M&Ms or chocolate chips into the sides of each treat to look like Frankenstein’s neck bolts.
- Chocolate Spider “Turtles”
- Break each pretzel in half through the center, then snap away the small inner loops of the twisted design, leaving just the curved outer arches — these arched pieces become the spider’s legs. For each spider, arrange four arched legs per side, eight total, on a parchment-lined tray, leaving a gap in the center for the body.
- Microwave the caramels with the heavy cream in a microwave-safe bowl in 15-second bursts, stirring between each, until smooth and just pourable.
- Spoon a small mound of the softened caramel onto the center of each pretzel-leg arrangement, pressing gently so the legs stay embedded. Adjust the legs so they angle slightly upward from the body, like a standing spider, rather than lying flat.
- Refrigerate for 5 to 10 minutes, until the caramel firms up slightly.
- Melt the chocolate in a microwave-safe bowl in 20-second bursts, stirring between each, until smooth.
- Spoon the melted chocolate over each caramel mound to fully cover it, forming a rounded spider body and leaving the pretzel legs peeking out.
- While the chocolate is still wet, press two candy eyes onto the front of each spider body. Sprinkle with flaky sea salt, if using.
- Let the spiders set at room temperature, or refrigerate for about 15 minutes, until the chocolate is firm.
Notes
- Work in small batches of 3 to 4 strawberries at a time so the chocolate doesn’t set before you have a chance to add the eyes.
If you’d prefer a cleaner shape without a puddle of “robe” at the base, push the skewers into a block of floral foam or oasis foam to hold the strawberries upright while the excess chocolate drips down and away, then transfer to the parchment-lined tray to set.
These are best made close to serving. Refrigerated strawberries can sweat once they come back to room temperature, which will dull the finish on the chocolate.
If you’d like a smoother, glossier coating, the coconut oil helps thin the chocolate slightly and makes for easier dipping — it can be left out if you prefer a thicker shell. - Grease your hands or spatula generously before working with the green marshmallow mixture — it’s noticeably stickier than a traditional rice krispy treat.
Let the candy melt hair set for a few minutes before adding the eyes, so they don’t slide out of place.
These keep well in an airtight container at room temperature for up to 2 days. - Work in small batches — both the caramel and chocolate firm up quickly, so it’s easiest to assemble a few spiders at a time.
For extra spooky texture, drag a toothpick through the wet chocolate on each body to create subtle web-like lines before it sets.
If you’d like straighter, thinner legs instead of the arched look, thin pretzel sticks broken into pieces work well in place of the traditional shaped pretzels.
Store in an airtight container at room temperature for up to 5 days.
Looking For More Recipes?
Check out Salt & Honey’s Youtube channel for more recipe, meal prep, and even a behind-the-scenes look of S&H! In addition to our Halloween treats, we have a plethora of recipes to dive into!
Meal Prep Guides
Not only do we empower your recipe bank with gems like our easy meal prep overnight oats but we have also developed a monthly meal prep guide. We utilize seasonal ingredients and the entire guide is centered around dishes with similar components.
Through the use of batch cooking, we want to make cooking easy, delicious and affordable. You can create the entire meal prep guide to plan your whole week or simply pick and choose which dishes resonate with you!
Make sure to check out our Youtube to find which we meal prep guide dishes we’re cooking for the week!
Take a look at our October meal prep guide!
Additional Resources
Pinterest Board: Check out our mood boards designed to provide even more inspiration for hors d’oeuvres. Here you can find more photos and videos covering our wide range of catering and event planning expertise. Whether you’re searching for food inspiration, food recipes, homemade decor, wedding planning ideas, and more, our mood boards will have your creativity soaring!
Substack: Monthly notes on slow living and seasonal flavors from Salt & Honey Catering and Events. Discover the recipes, garden tasks, and hosting tips that define our own event production. Here we will provide exclusive recipes, tips, and tricks only available on our free Substack!
Youtube Vlog: Ever wonder what the Catering and Event Production side of world looks like? Our “Beyond The Banquet” vlog series provides a peak through the curtain! These short videos display the chaos and serenity behind the business. Come check it out now!
Instagram: Our feed provides a plethora of photo inspiration as well as DIY’s and tutorials on projects you can embark on at home. Whether it’s food recipes or even home decor, we will have what you’re searching for!
Catering/Event Planning: Contact us here and let’s work together to create your dream event!